
One of the defining features of Skype is its ability to allow users to share their screens within a Skype conversation, very useful for allowing people to share pages, helping faraway friends learn how to do tasks on a computer, or just simply showing off your computer’s look and feel. Users can even show off photos without having to send them over the instant messaging service. Screen sharing works across platforms, so the following steps will be the same or similar whether you’re on Windows, Mac, or Linux.
Currently, users are allows to share their screens with one person at a time without opting into the Skype Premium service, which allows users to share screens within a group. If you’re using the Mac version, at least one person must have Skype Premium for screen sharing to work. Microsoft is currently offering Skype Premium free for 30 days, so if you’re interested in trying out the group sharing, that might be an offer to take advantage of while you can. Users will also need at least 512 MB of memory on a minimum 1GHz CPU, Mac OSX or higher (if you’re not using Windows and Linux of course), and the latest version of Skype. Another thing to keep in mind is that only one user at a time may share his or her screen, but sending files, video and voice calling, and instant messaging will all still work.
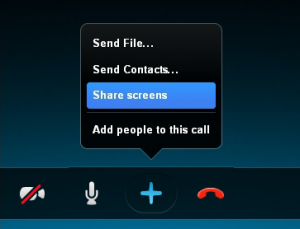
To get started with screen sharing, simply make a voice or a video call to the contact or contacts you wish to share your screen with. While in the call, touch or click on the “+” button. This will bring up a menu with options such as “Send File…“, “Send Contacts…” and “Share screens.” Obviously, you’re going to want to select the latter option.
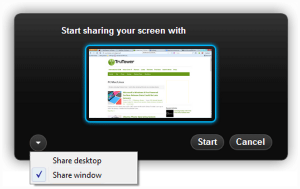
This will bring up another box with options to “Start” or “Cancel.” By clicking “Start,” you will share your entire desktop. There is also a drop-down arrow on the left that provides you the option of sharing only the active window rather than the desktop. If you choose to share only a window, select the window you want to share once you’ve selected the “Share window” option from the drop down. Then click “Start.” Your screen or your window (depending on the option you selected) is now shared with your contacts.
During the call while your screen is being shared, you’ll have the options to “Change sharing options” to toggle between sharing the desktop and the window as well as an option to stop screen sharing.